Discussions
In Discussions, instructors can assign ungraded discussions to students and sections. To assign students or sections to an ungraded discussion, click the Manage Assign To link on the create or edit a discussion page. Only students assigned to the discussion can view and participate in the ungraded discussion.
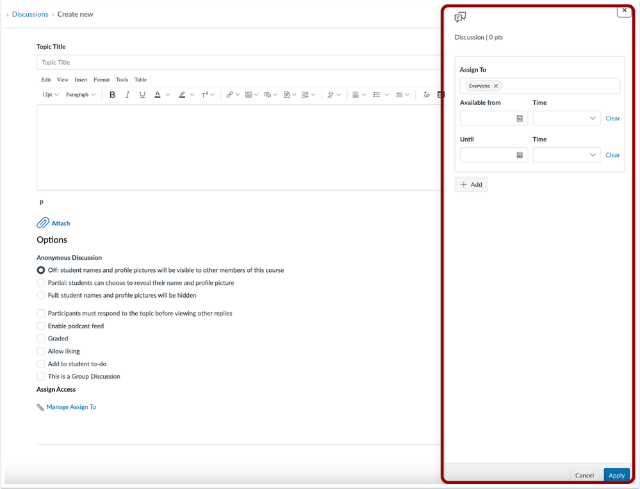
- Canvas Discussions creation page showing a new topic setup screen. Main area includes fields for topic title, description, and text formatting tools. Options below include anonymity settings, grading, and discussion preferences. Right sidebar, outlined in red, displays assignment settings for availability dates and recipients.

Inbox
Users now have the option to configure a signature when composing a message. To create a signature, select the Signature On radio button [1] and enter the desired signature in the Signature field [2]. Then, click the Save button [3].- Canvas Inbox settings window showing how to add an email signature. The Signature section includes options to turn the signature on or off, with “Signature On” selected. A sample signature for Professor Daren Dickenson with office hours and phone number is displayed. Buttons to Cancel or Save appear at the bottom, with Save highlighted in blue.


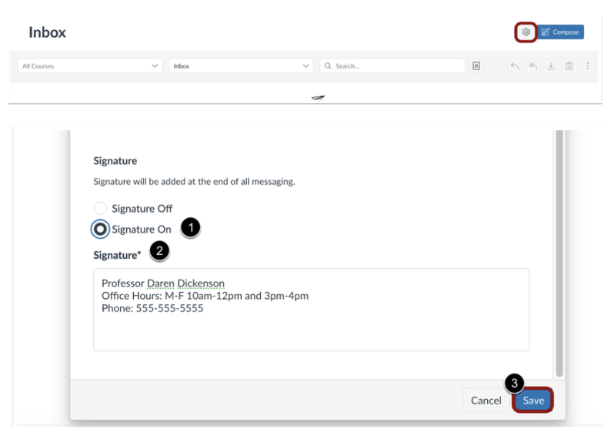
Also, when Enable Inbox Auto Response is enabled, users have the option to set an auto-response for messages. To create an auto-response message, select the Response On radio button [1] and enter the Start Date [2], End date [3], Subject [4] and Message [5]. Then, click the Save button [6].
- Canvas Inbox Settings window showing the Out of Office configuration panel. “Response On” is selected to enable automatic replies to incoming mail. Fields for start date, end date, subject, and message are filled in with an example out-of-office note. A blue Save button is highlighted at the bottom next to the Cancel option.


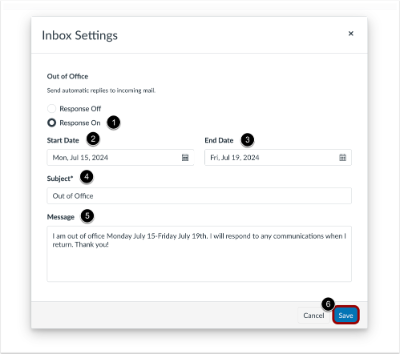
Modules and Assignments
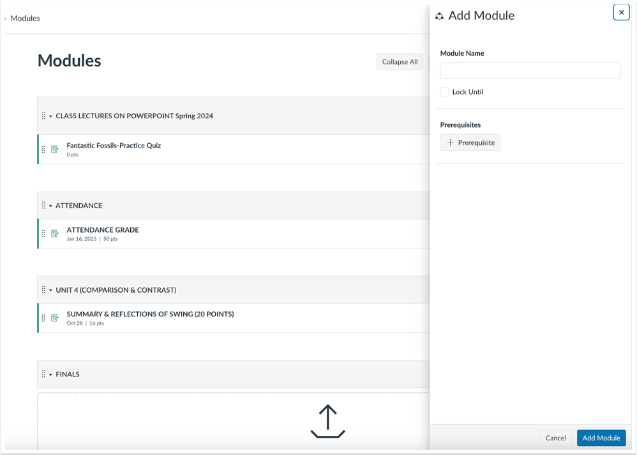
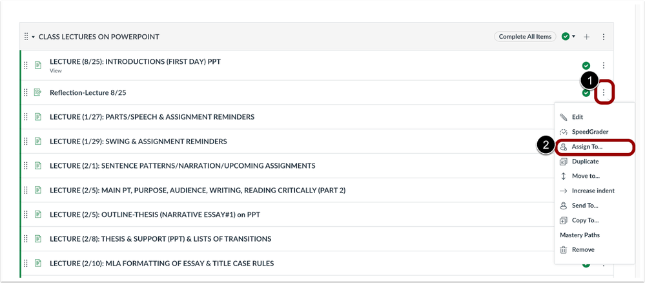
On the Modules page, instructors can assign students to an entire module and individual module items from the Modules page. Additionally, the Add Module and Edit Module Settings pages are redesigned as trays.

- Canvas Modules page displaying a list of course modules such as “Class Lectures on PowerPoint Spring 2024,” “Attendance,” and “Unit 4 (Comparison & Contrast).” On the right side, the Add Module panel is open, showing fields for entering a module name, lock settings, and prerequisites. Buttons to Cancel or Add Module appear at the bottom, with Add Module highlighted in blue.

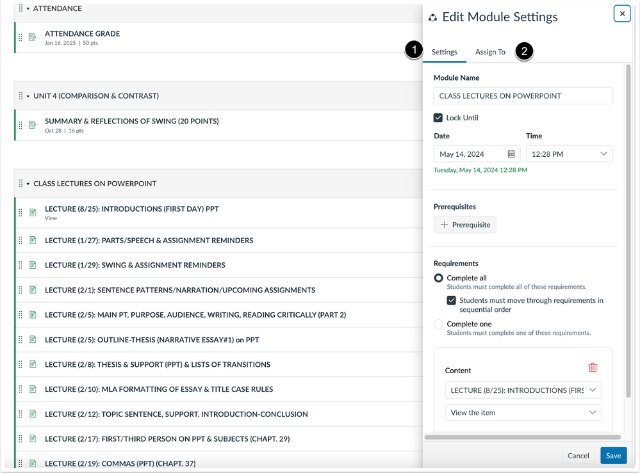
When editing a module, the Edit Module Settings is redesigned to display as a tray with a Settings tab [1] and an Assign To tab [2]. If a student is assigned only a specific item within a module and not the entire module, they will see only that item in the feature area, such as an assignment on the assignment page, and not the rest of the module.
If a student is assigned an entire module, but only specific items within that module, students can only view the items they are assigned.

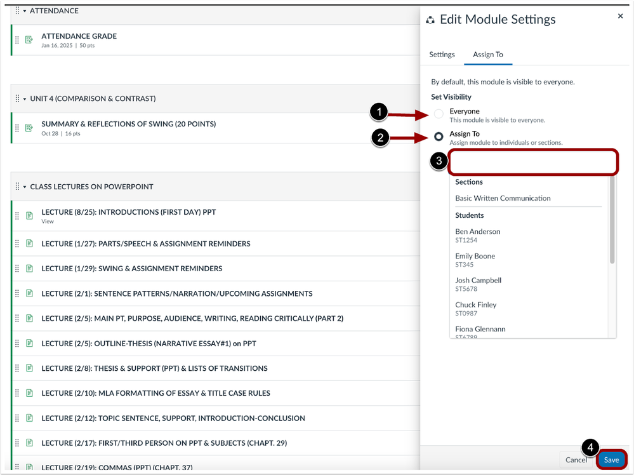
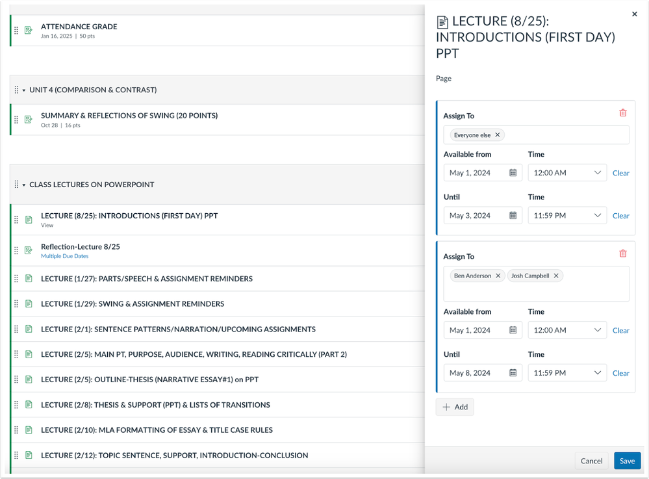
Using the Assign To tab, instructors can set the module visibility to Everyone [1] or assign it to specific students [2]. In the Assign To field [3], instructors can select students or sections using the drop-down menu, typing student names, SIS IDs (if available), or section names . Lastly, click the Save button [4].

- Canvas Modules page showing multiple course modules such as “Attendance,” “Unit 4 (Comparison & Contrast),” and “Class Lectures on PowerPoint.” The Edit Module Settings panel is open on the right side under the “Assign To” tab. The “Assign To” option is selected, displaying a list of sections and individual student names. A Save button is highlighted in blue at the bottom, next to a Cancel butt

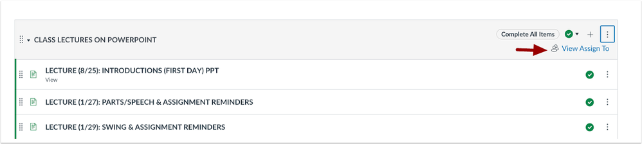
On the Modules page, instructors can also access the Assign To tab by clicking the Options icon [1]. Then, select the Assign To link [2]. When a module is differentiated for specific students, a View Assign To link displays to easily review or edit visibility.

Canvas Modules page showing a course module titled “Class Lectures on PowerPoint” with several listed lecture items. A dropdown menu is open in the top-right corner of the module, showing options such as Edit, Move Contents, Move Module, Assign To, Delete, Duplicate, and Send To. The “Assign To” option is highlighted, indicating where to click to assign the module to specific students or sections.
- Canvas Modules page displaying the section titled “Class Lectures on PowerPoint,” containing several listed lecture items. A red arrow points to the View Assign To link on the right side of the module header, which allows users to see which students or sections the module has been assigned to.


To assign a specific module item to a student, click the Options icon [1], then select the Assign To link [2]. After selecting the Assign To link, a tray displays where instructors can differentiate assignment availability dates and due dates. Then, click the Save button.

- Canvas Modules page displaying the “Class Lectures on PowerPoint” section with a list of lecture items. A dropdown menu is open next to one lecture, showing options like Edit, SpeedGrader, Assign To, and Duplicate. The “Assign To” option is highlighted, with numbered callouts indicating the menu button (1) and the Assign To selection (2).

Canvas Modules page showing multiple course sections including “Attendance Grade,” “Unit 4 (Comparison & Contrast),” and “Class Lectures on PowerPoint.” The “Lecture (8/25): Introductions (First Day) PPT” item is selected, and the **Assign To** panel is open on the right. Two assignment groups are visible—one for “Everyone else” with availability from May 1 to May 3, 2024, and another for “Ben And

Pages
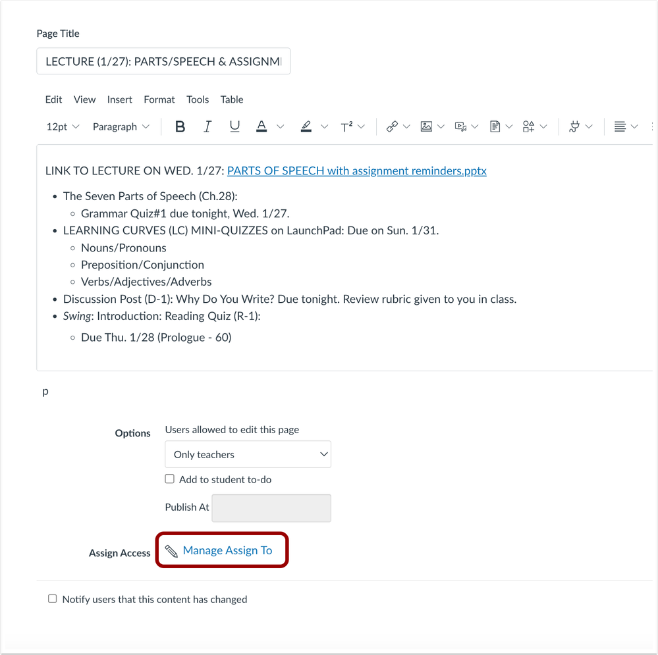
Additionally, instructors can edit and differentiate visibility dates for students for pages. When viewing a page, instructors can use the Assign To button to quickly manage availability dates and assign them to students or when editing or creating a page, click the Manage Assign To link.

- Canvas page editor for “Lecture (1/27): Parts/Speech & Assignment Reminders.” The page includes lecture notes, links, and bullet points outlining quizzes and discussion topics. At the bottom of the editor, a red box highlights the Manage Assign To link, which allows instructors to control which students or sections can access this page.

- Canvas page editor showing “Lecture (1/27): Parts/Speech & Assignment Reminders” with lecture details and assignment links. On the right, the Assign To panel is open, displaying availability settings for “Everyone else” and “Ben Anderson” with specific date and time ranges. The Apply button at the bottom is highlighted, ready to save the assignment visibility settings.

Rubrics: 
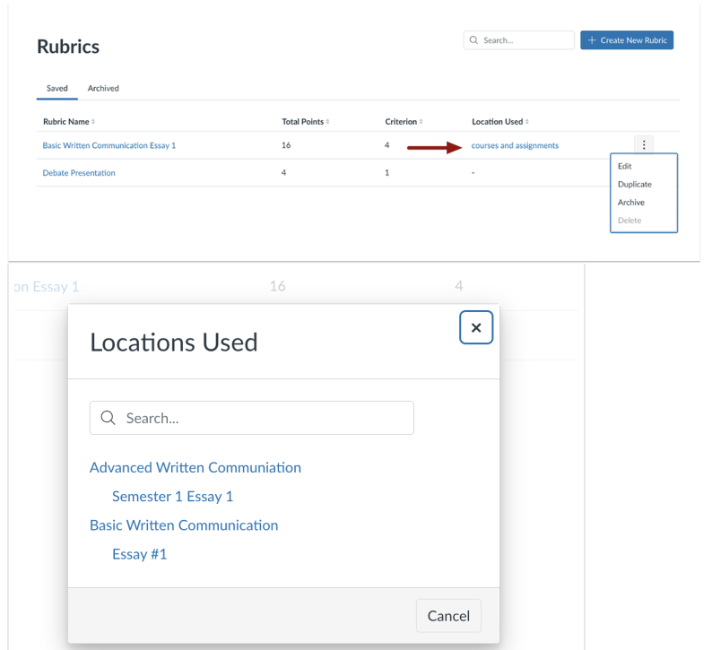
The Rubrics page is redesigned. Tabs are available to display Saved [1] and Archived [2] rubrics. A search bar [3] is available and the Create New Rubric button [4] is updated. Admins and instructors can also sort rubrics in ascending and descending order by Rubric name [5], Total Points [6], Criterion [7], and Location Used [8]. Additionally, an options icon [9] is available for each rubric, allowing users to easily edit, duplicate, archive, or delete rubrics [10].

Note: Rubrics cannot be edited or deleted once they have been added to an assignment. However, this can be duplicated for additional edits and the creation of new rubrics.

- Canvas Rubrics page showing a list of created rubrics with details. Tabs at the top allow switching between Saved and Archived rubrics. Options include searching rubrics, creating a new rubric, viewing rubric names, total points, number of criteria, and locations used. A three-dot menu on the right provides options to Edit, Duplicate, Archive, or Delete a rubric.

When creating a new rubric, enter a Rubric name [1] and Rating Order [2]. To add a new criterion, click the Draft New Criterion button [3]. To create criterion from an outcome, click the Create from Outcome button [4].

- Canvas Create New Criterion window for adding a rubric criterion. Fields are provided for entering the Criterion Name and Description, along with options to enable a points range. Columns allow instructors to assign Points, Rating Names, and Rating Descriptions for performance levels such as “Exceeds,” “Mastery,” “Near,” and “Below.” The Save Criterion button at the bottom right is highlighted

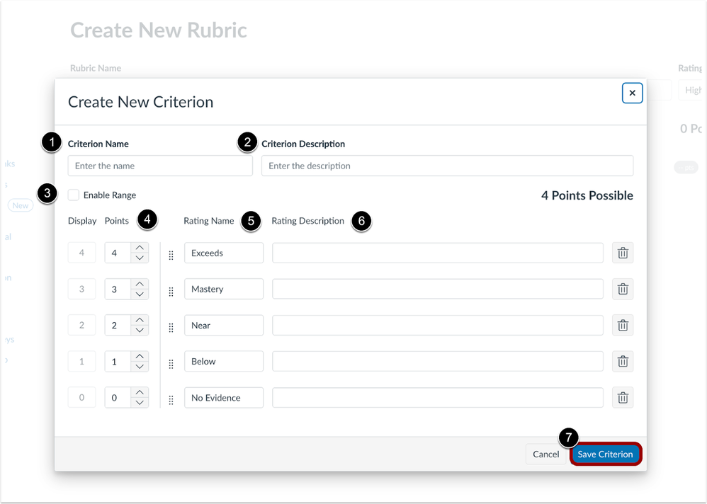
When creating a new criterion, enter the Criterion Name [1] and Criterion Description [2]. To enable a point range, select the Enable Range checkbox [4]. Then, determine the desired Points [4]. Rating name [5], and Rating Description [6]. Then click the Save Criterion button [7].

- Canvas Create New Criterion window for building a rubric item. Users can enter a Criterion Name and Description, choose to Enable Range, and set Points and Rating Names such as Exceeds, Mastery, Near, Below, and No Evidence. Each rating can include an optional Description field for clarification. The Save Criterion button at the bottom right is highlighted to confirm and save the new rubric cri

On the Rubrics page, click the Courses and Assignments link to view which course rubrics are used. At the account and course level, users can view the list of courses and assignments where the associated rubric is used. Additionally, all courses and assignments are hyperlinked for easy access.

- Canvas Rubrics page showing the list of saved rubrics with details such as rubric name, total points, number of criteria, and locations used. An arrow points to the “courses and assignments” link, which opens the Locations Used window. The pop-up lists where the rubric is applied, including courses like Advanced Written Communication and Basic Written Communication, along with specific assignme