Making Events
Making Events For Solomon and/or Your WWW Site
| In brief... |
|---|
|
*Events is one big bucket of events for EVERYONE at the university. Do not edit other's events without permission. Events are NOT part of your site's structure, they are made under Events, above or at the same level as your sites. Find that link to Events, click on its name, then navigate to Content tab. It is a good idea to search for the event to make sure someone hasn't already created it. Do a partial name search using the Filter box near the top right. That will filter out non-matching results. Clear the filter box after checking. Use +Create Content green button in top right. If given a choice, pick Calendar Event. If not, you should be taken right into a Calendar Event template. Enter Name for event. Use common terms that will be obvious to those outside your discipline. Category is a drop down that allows multiple choices of the type of event. These flags help the event to appear on various calendars that are not just your department calendars. Program/Dept Category is how you tie the event to YOUR site. Multiple choices can be made here. All site choices will show this event. Start/End Date choices are notes as to when this event happens. Recurring choices are only notes on THIS event. It won't make other events for other times for you. Brief Description is a quick summary of the meat of your event (who what when where). Do NOT include info here that is not in the Description. Brief Description only shows in the feed and not when an event is opened. Description is where you put the relevant info to act on the event. Always give someone a way to follow up for more info or to RSVP. Location is important, don't include nicknames for places. Not everyone will know them. Organizer is where you add sponsoring departments/groups. Event Image is optional, but places an image in the event calendar feed and across the top of the event when opened. Show on Public Website: Use the Yes option to show on WWW and Solomon, uncheck to just reach internal audiences. Save And Approve under blue drop-down in bottom right. |
We love to see all the wonderful events happening across campus on the Longwood website calendar. You probably realize that by publicizing your events on your SOLOMON and WWW websites you are capitalizing on the considerable amount of traffic that visits every day, but did you realize that the Marketing department utilizes that calendar to select events to further publicize in other ways?
Whether it’s promotion on the homepage, social media or our other channels, the website calendar is an essential tool for Marketing and Communications when it comes to discovering activities across campus. We want to help publicize your events and showcase Longwood’s diverse and active community.
Well, how might you go about that?
A quick recap first... Departmental editors have access in TerminalFour to the SOLOMON version of your sites only. SOLOMON is the internal/inTRAnet version of our website that is intended for content that helps faculty and staff to be able to do their jobs. It is not generally for adding things that go to the public as the WWW version of the site is. There are however, two exceptions. News and Events. BOTH can be shown on the Solomon version of your site for Internal faculty/staff consumption OR BOTH Solomon and WWW for Events and News that are important to BOTH audiences. If you need changes to your WWW version of your site's content, you can put in a request for assistance through our Support Form.
Now-to Events....
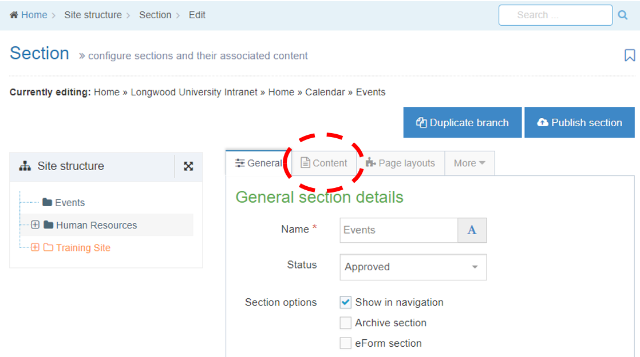
Events are a little different from other content, in that they are not made in your site, but instead out in the black Events folder in the Site Structure, apart from your site. It is visible as "Events" by itself. Open the Events folder (which is a Section) with a single left click. You can also get going by going to the associated Actions button, then Edit.

Now, open the Content tab the same way you would manage any other content.
From here, you will see ALL EVENTS from ALL DEPARTMENTS. This is important to note so that you don't inadvertently edit another department's events. It is a positive feature in that it allows you to have a single event that is displayed on MULTIPLE department calendars vs. having MANY similar entries in the calendar for the same event. Please reach out to the other department's web contact before adding your own department to an existing event.
Use the green +Create Content button near the top right to create a new event.

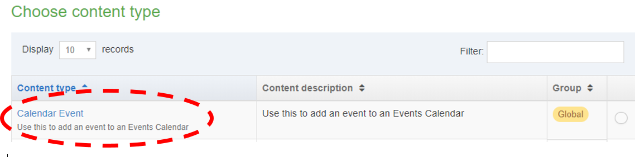
From here, you're choosing the Content Type, which in this case, will be "Calendar Event". Click on the blue link of the name Calendar Event.
You'll now be taken to edit this new event. Start by picking a name. Try to not be too generic and try to avoid verbiage that those "out of the know" may not be familiar with.
For Example:
Bad: Come get a snack!
Good: Come get a snack at the Greenwood library to celebrate Book Week!
Next, we need to choose a Category. Categories help your event find a home in non-departmental calendars that the university maintains. You can choose more relevant categories by coming back again and choosing another choice in the drop-down. If you pick the wrong one, just use the X next to the bad choice to remove it.
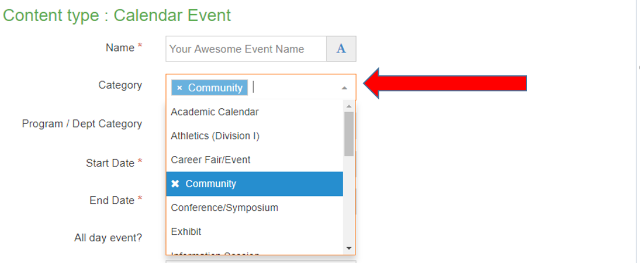
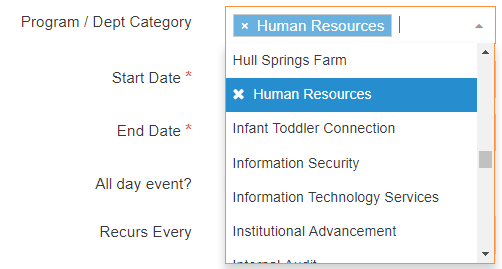
Program / Dept Category is the most vital part to getting your event on your website because the departments you choose selects the departments that display that event. As with Category, multiple selections can be made by re-visiting the drop-down menu.
Start Date and End Date determine the dates and times of the event. To select them, click in the white box and not on the calendar icon.
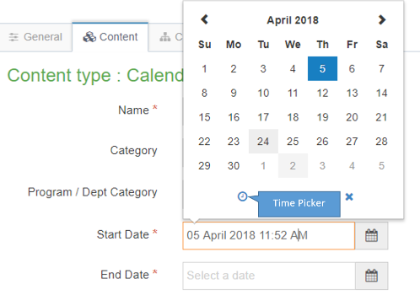
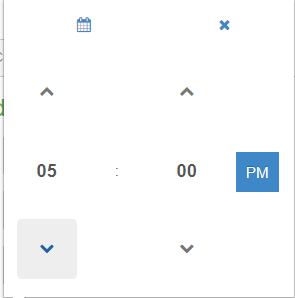
To set the time, use the small clock icon indicated in the capture above, near the bottom of the calendar in this display. You can cycle through the digits using the arrows or you can click on the numbers to see a grid of choices to pick from. Click on the AM or PM options to toggle to the needed choice.
For events that will last all of the chosen day, use the "All Day Event?" checkbox.

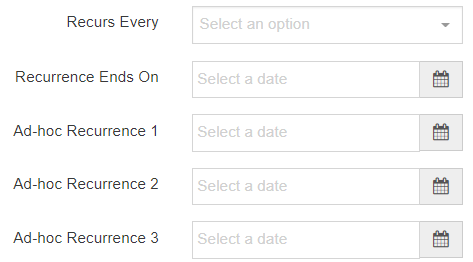
Recurring Events are covered in the next series of boxes. Be aware that these checkboxes are only notations on THIS event and will NOT create subsequent new events for other dates and times. Dates and times are configured in the same way as noted above in the initial Start/End Date section.
Brief Description
Brief Description is a shortened version/the highlights of your event and who it is for. Think "Cliff Notes". The Brief Description is shown as a sort of teaser on a full calendar view.
Description
The Description box is where the bulk of your description and details about the event go, but be aware the location and organizer boxes are coming up below. This may contain how one RSVPs, desired dress, parking, or other special instructions and details.
Location
Where will this be and what room(s) will it be held in?
Organizer
Which department or organization is putting this on? Are there other sponsors?
Event Image
The event image is your main image for this event. It displays across the top of the event when you open it and it is shown as a thumbnail next to any calendar it appears in. Event Images are optional.

Social Media Section
Social Media Image is an image that takes over if an image is shared on social media platforms Facebook and Twitter, even if an Event Images is used on this event already. It lets you target social media users in a special way. This is optional as well.

The other textboxes in the social media area target text to Facebook and Twitter users that this event is shared to. These are optional and are unnecessary on most events.
Show on public website checkbox - is how you determine whether an event is on your SOLOMON site ONLY or SOLOMON AND WWW sites. This has to be done in combination with the Program / Dept Category setting above to make sure your event appears on the correct calendar.
Save and Approve
As with anything in TerminalFour, you need to save your event with the dropdown at the bottom right by choosing Save and Approve. Just doing Save changes will save your progress, but will NOT publish the event to the public.

Show on Public Website
This is probably the second most important thing to toggle. UNchecked, and event shows on SOLOMON ONLY. Checked, it shows up on SOLOMON AND WWW sites related to the chosen department.

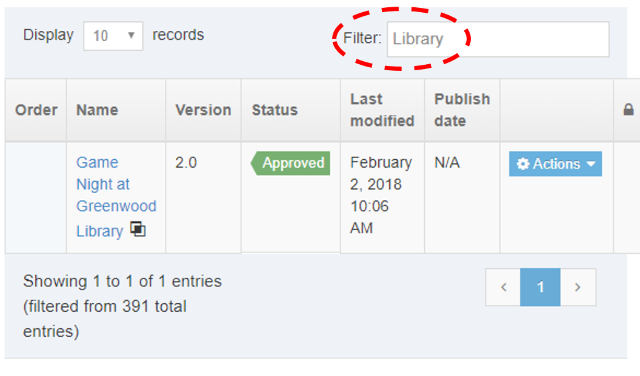
To find and edit an existing event to edit, use the Filter box near the top to narrow the choices matching your description. Click on its name in blue or use Actions > Edit. Until you clear the Filter text, only the narrowed set of results will display.